


Your First Make.com Automation A Practical Beginners Guide to Streamlining Tasks
In today’s fast-paced digital environment, automating repetitive tasks is essential for efficiency. This tutorial is designed for beginners to introduce Make.com, a powerful visual platform that allows you to connect apps and services to create automated scenarios. You will learn how to visually build workflows that move information and perform actions automatically, saving you valuable time and reducing manual errors.
Table Of Content
- Make.com Tutorial for Beginners: A 2026 Step-by-Step Guide to Automate Your Work
- Key Components to Start Building
- Your First Automation: Connecting Google Sheets to Gmail
- Building the Workflow Step by Step
- Setting Up Your Make.com Account and Navigating the Interface
- Key Areas of the Make Interface
- Creating a New Scenario and Choosing Your First Modules
- Building the Workflow Chain
- Configuring the Google Sheets “Watch Rows” Trigger
- Step-by-Step Setup and Key Considerations
- Mapping Data from Sheets to a Gmail “Send an Email” Action
- How to Map Fields in Your Workflow
- Running a Test and Switching Your Scenario to Live Mode
- Activating Your Automated Workflow
- How to Find and Use Pre-Built Templates
- Steps to Implement a Template
- Browsing the Template Library for Common Workflow Ideas
- How to Effectively Use Templates for Learning
- Q&A
- I’m completely new to automation. What is the very first thing I should do in Make.com after signing up?
- Can I use Make.com to save email attachments to Google Drive automatically?
- How does the visual builder work? I’m confused by terms like “modules,” “routes,” and “filters.”
- What’s the difference between the free and paid plans? Are there major limits?
- I built a scenario, but it’s not running. What are the most common reasons for this?
- I’m a total beginner. What is the absolute first thing I should do after signing up for Make.com?
- I connected my apps and built a scenario, but it’s not running. What are the most common mistakes I should check for?
- Learn core concepts: build scenarios using trigger modules, action modules, and connections to link your apps.
- Use templates: explore and customize pre-built workflows to learn structure, mappings, and common automation patterns quickly.
- Test and monitor: run test executions, fix mapping or connection errors, then activate and review scenario history regularly.
We will start by exploring the Make.com interface, guiding you through the main dashboard where you manage all your automations. You will learn how to establish your first connections to popular apps and services, a fundamental step that enables all your future integrations. These connections allow different tools to communicate, forming the backbone of any automation.
This guide will then walk you through the core concepts step-by-step, beginning with triggers–the events that start your automation. We will use pre-built templates to quickly understand common workflow patterns before teaching you how to construct your own custom scenarios from scratch. By the end, you will have the foundational knowledge to automate your own work processes with confidence.
For new users, Make.com offers a free plan that allows you to test the platform without any upfront cost or credit card required. After signing up, you get a monthly allowance of operations, access to the visual scenario builder, and the ability to connect popular apps to create and run basic automations. This free limit is ideal for exploring Make’s features, validating automation ideas, and building your first workflows before deciding whether to upgrade to a paid plan.
Make.com Tutorial for Beginners: A 2026 Step-by-Step Guide to Automate Your Work
Welcome to your essential Make.com tutorial for 2026. This guide is designed for absolute beginners to understand the core concepts of automation. Make.com is a powerful visual platform that connects your favorite apps and services, allowing you to build automated scenarios that save time and eliminate repetitive tasks. By the end of this guide, you will grasp the fundamental building blocks needed to create your first automation.
The heart of Make.com is the scenario, which is a visual blueprint for your automation. You construct a scenario by dragging and dropping modules onto a canvas and linking them together. These modules represent specific actions in apps like Google Sheets, Slack, or Salesforce. The sequence of connected modules forms a workflow that executes automatically based on the rules you set.

Key Components to Start Building
Every automation begins with a trigger module. This is the event that starts your entire workflow, such as receiving a new email, a form submission, or a scheduled time. After the trigger, you add action modules to define what happens next. To use these modules, you must first establish connections between Make.com and your web services, which is a simple one-time authentication process.
To accelerate your start, explore Make’s library of pre-built templates. These are ready-made scenarios for common tasks, such as syncing leads between platforms or posting social media updates. They provide an excellent way to learn by example and can be customized to fit your exact needs. The vast number of supported integrations means you can likely automate processes between all the tools you already use.
Follow this simple ordered approach for your first automation:
- Choose a repetitive task to automate.
- Select a relevant template or start a blank scenario.
- Establish the necessary app connections.
- Set your trigger module and configure it.
- Add action modules to complete your workflow.
- Run a test to ensure everything works correctly.
Remember, successful automation relies on clear planning. Below is a basic table outlining common module types:
| Module Type | Purpose |
| Trigger | Initiates the scenario (e.g., “New Form Entry”) |
| Action | Performs an operation (e.g., “Create a Spreadsheet Row”) |
| Search | Finds existing data in an app |
| Filter | Routes data based on conditions |
With practice, you will move from using simple templates to designing complex, multi-step workflows. The power of Make.com lies in its flexibility–you control the logic, data flow, and integrations to create truly bespoke automations for your work in 2026 and beyond.
Your First Automation: Connecting Google Sheets to Gmail
Welcome to this hands-on tutorial where you will build your first automation. We will create a system that sends a personalized email from your Gmail whenever a new row is added to a Google Sheet. This is a classic example of how integrations between different apps can save you hours of manual work. You’ll see how Make.com acts as the intelligent glue, forming connections between services to move data automatically.
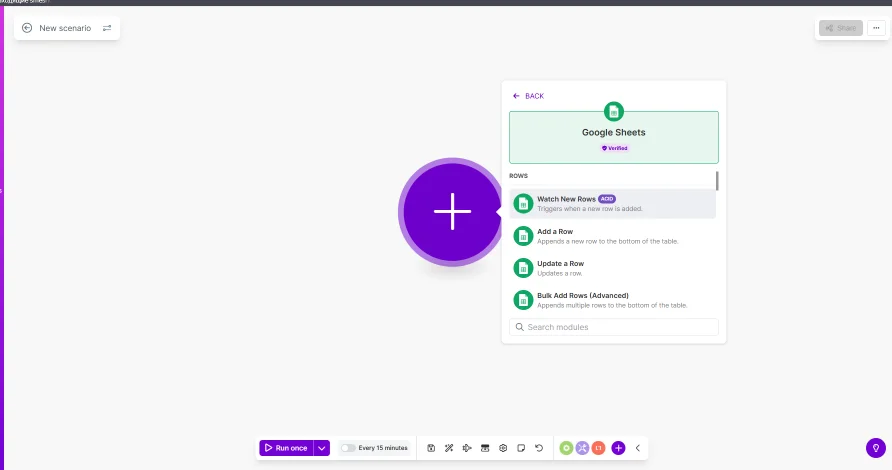
To begin, log into your Make.com account and navigate to the main dashboard. This is your control center where you can view and manage all your automations. Instead of starting from scratch, we can explore the available templates, which are pre-built scenarios for common tasks. For now, click “Create a new scenario” to build ours step-by-step and truly understand the core concepts.
Building the Workflow Step by Step
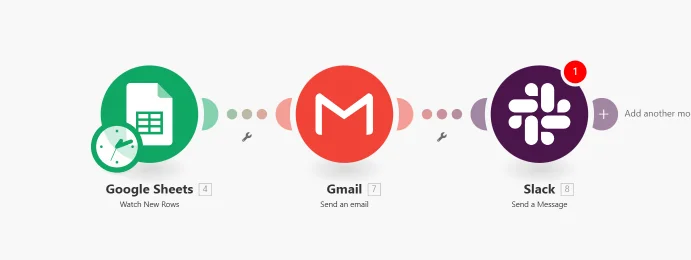
In Make.com, an automation is called a scenario, which is a visual sequence of modules. Each module performs a specific action. Our scenario will have two main modules: one for Google Sheets (the trigger) and one for Gmail (the action).
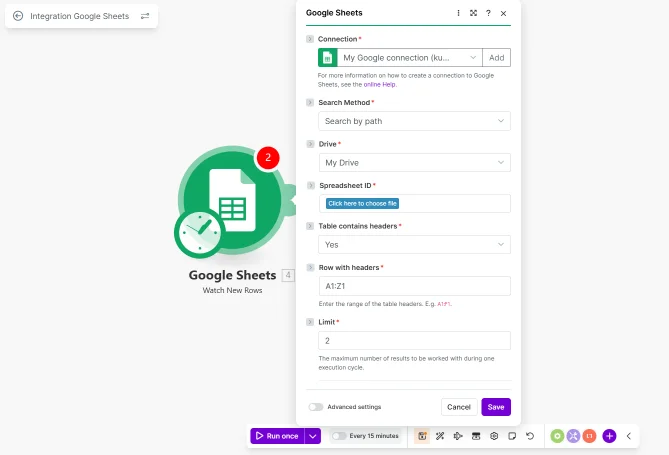
- The Trigger Module: First, add the Google Sheets module. Choose the “Watch new rows” trigger. You will then be prompted to establish a connection to your Google account and select the specific spreadsheet and worksheet to monitor.
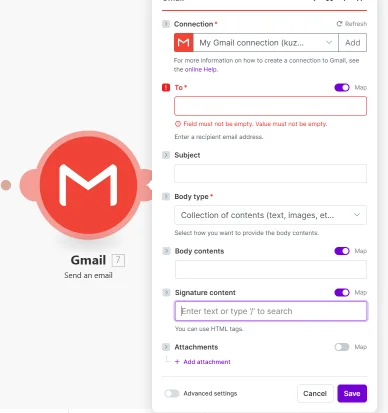
- The Action Module: Next, add the Gmail module. Select the “Send an email” action. Again, you’ll connect your Gmail account. Here, you can map data from your Sheet (like a recipient’s email from column A and a name from column B) directly into the email’s “To”, “Subject”, and “Body” fields.
Once these connections are set, your simple but powerful workflow is complete. The visual editor will show data flowing from the Sheets module to the Gmail module. You can now activate the scenario, and it will run automatically in the background.
| Module | App | Role in Workflow |
|---|---|---|
| Watch new rows | Google Sheets | Trigger: Starts the automation. |
| Send an email | Gmail | Action: Performs the main task. |
This fundamental process–trigger followed by action–is the building block for all advanced scenarios. By mastering these basic integrations, you can later automate complex workflows involving data filtering, multiple steps, and numerous apps, all from your Make.com dashboard.
Setting Up Your Make.com Account and Navigating the Interface
Your automation journey begins by creating a free Make.com account. The sign-up process is straightforward, requiring just an email address. Once registered, you’ll be greeted by the central dashboard. This is your mission control, providing an overview of your active scenarios (what Make.com calls automation workflows), recent runs, and available templates. Spend a moment familiarizing yourself with this main view, as it will be your starting point for every project.
To build automations, you’ll primarily work within the scenarios editor. Click “Create a new scenario” to enter this visual workspace. Here, you construct workflows by dragging and dropping modules–the building blocks that represent apps or actions–onto the canvas. The left panel is crucial; it houses the searchable app directory for integrations, a library of pre-built templates, and tools to manage your connections (the authorized links between Make.com and your other apps like Google Sheets or Slack).
Key Areas of the Make Interface

Understanding a few core areas will accelerate your learning. The Connection management section is where you authenticate external services, a vital first step for any automation. The Templates library is an excellent resource for beginners, offering ready-made scenarios you can copy and customize. For hands-on guidance, explore the built-in interactive tutorial that walks you through creating your first simple workflow.
When you open a scenario, you interact with different types of modules:
- Trigger Module: The starting point of a workflow (e.g., “Watch new emails”).
- Action Module: Performs a task (e.g., “Create a spreadsheet row”).
| Interface Element | Primary Purpose |
|---|---|
| Dashboard | Overview of all scenario activity and history. |
| Scenarios Page | List, create, and manage all your automation workflows. |
| App Directory | Browse and search for all available app integrations. |
| Connections | Manage your authenticated logins to third-party services. |
Start by exploring a pre-built template from the library. This allows you to see a complete workflow structure, understand how modules are chained together, and learn how connections are utilized. This practical exploration is often more effective than any theoretical tutorial.
Creating a New Scenario and Choosing Your First Modules

Welcome to the practical part of this tutorial. After logging into Make.com, you’ll start by clicking the “Create a new scenario” button. Think of a scenario as a blank canvas where you will build your automation workflows. The platform offers a variety of pre-built templates for common tasks, but as a beginner, starting from scratch is the best way to learn. Your first step is to select the applications you want to automate between, which is where integrations and connections come into play.
Before adding modules, you must establish a connections to the apps you plan to use, like Google Sheets or Slack. This authorizes Make.com to access your data. Once connected, you can drag your first module onto the canvas. This initial module is almost always a triggers–a module that watches for a specific event, such as a new form submission or an added spreadsheet row, to start the entire workflows.
Building the Workflow Chain
After setting your trigger, you build the sequence by clicking the plus sign to add the next module. You will choose an action module from the same app or a different one. For instance, a trigger from a Google Form can be followed by an action module from Gmail to send a confirmation email. The key is to understand that scenarios are built step-by-step by linking these modules together.
A simple structure for your first automation could be:
Trigger: “Watch for new rows” in a Google Sheet.
Action: “Send a message” to a Slack channel.
Here is a basic comparison of the two core module types:
| Module Type | Purpose | Example |
|---|---|---|
| Trigger | Initiates the scenario on an event. | New email in Gmail. |
| Action | Performs a task after the trigger. | Create a task in Todoist. |
Remember, you can always return to the tutorial section or explore templates for inspiration as you learn to construct more complex workflows with multiple apps and integrations.
Configuring the Google Sheets “Watch Rows” Trigger
In this tutorial, we will set up one of the most useful triggers for automating data tasks. The “Watch Rows” trigger from Google Sheets allows your workflows to start automatically whenever a new row is added or an existing row is edited in your specified spreadsheet. This is fundamental for creating dynamic automations that react to your data in real-time.
Before you begin, ensure you have established the necessary connections between Make.com and your Google account. Navigate to the main dashboard, create a new scenario, and search for the Google Sheets app. You will find the “Watch Rows” module among the list of available triggers. Selecting it is the first step to building your automated process.
Step-by-Step Setup and Key Considerations
After placing the Google Sheets “Watch Rows” module, you need to configure it. You must select the specific Drive, Spreadsheet, and Worksheet you want to monitor. A crucial setting is the “Watch” field, where you choose whether to trigger on new rows only or on all changes. For beginners, starting with new rows is often simpler.
To effectively use this trigger, consider the following common patterns:
- Using it with pre-built templates to quickly automate common tasks like lead notifications or data backups.
- Connecting it to various integrations such as Gmail, Slack, or CRM systems to distribute information instantly.
- Scheduling regular executions in the scenario settings to ensure the trigger checks for updates reliably.
The power of this trigger is fully realized when chained with subsequent modules. For instance, a new row could automatically generate a document, send an email, or update a project management tool. The table below outlines a simple workflow structure:
| Step | Module | Action |
|---|---|---|
| 1 | Google Sheets | Watch Rows (Trigger) |
| 2 | Gmail | Send an Email |
| 3 | Slack | Post a Channel Message |
Finally, always test your configuration by adding a new row to your sheet. Check the scenario’s execution history to see if the trigger was activated and your workflows began correctly. This setup forms the backbone of countless automations, turning your static spreadsheets into powerful, live data sources.
Mapping Data from Sheets to a Gmail “Send an Email” Action
In this tutorial, we will explore a fundamental automation scenario: sending personalized emails using data from Google Sheets. After establishing your connections to both Google Sheets and Gmail modules in Make, you will create a simple workflow. This process begins by setting up a Google Sheets module as the triggers point, which watches for new or updated rows of data.
Once your trigger is configured, you add the Gmail “Send an Email” action module. The real power of automation lies in the next step: mapping dynamic data from your sheet into the email. This is where you move from static messages to personalized communication, pulling information like recipient addresses, names, or order details directly into the email’s subject line and body.
How to Map Fields in Your Workflow
Inside the Gmail action module, you will click into fields like “To,” “Subject,” and “Body.” A panel will appear showing all available data from the previous Google Sheets module. You simply select the items you need, such as Email Address for the “To” field and Customer Name for a personalized greeting. For the email body, you can use pre-designed templates with placeholders that you replace with mapped data points.
Effective integrations like this rely on correct data mapping. Common setups include:
- Mapping a sheet’s “Email” column to the Gmail “To” field.
- Using a “Status” column to trigger emails only for specific rows.
- Combining text with mapped items (e.g., “Hello [Name], your order [OrderID] is ready.”).
After you finish mapping all necessary fields, run a test to ensure everything works. You can then activate your scenario and monitor its execution from the Make dashboard, where you can see successful runs or errors, completing your automated email workflow.
Running a Test and Switching Your Scenario to Live Mode
After carefully building your automation by selecting templates or configuring custom modules, establishing necessary connections, and defining your triggers and actions, the crucial step before going live is to run a test. This allows you to verify that all parts of your workflows operate correctly without affecting real data or external systems. You can initiate a test run directly from the scenario editor, and Make.com will execute the entire process, showing you a detailed log of each step’s execution.
![]()
Monitoring the test run is essential for troubleshooting. The platform’s dashboard during the test provides real-time feedback on each modules‘s operation, highlighting any errors in connections or data mapping. Successful testing confirms that your logic is sound and that the integrations between different apps are functioning as intended. Once you are confident in the test results, you are ready to activate the automation permanently.
Activating Your Automated Workflow
Switching your scenario to live mode is a simple but significant action. Navigate to the main overview of your scenarios and find the toggle switch next to the scenario name. Flipping this switch activates the triggers, meaning the automation will now respond to real-life events and execute its workflows autonomously. Your scenario will now operate continuously in the background, processing data and moving information between your connected apps based on the rules you’ve set.
In live mode, you should periodically check your scenario’s history on the dashboard to ensure it continues to run smoothly. The table below summarizes the key differences between the testing and live phases:
| Phase | Purpose | Data Used | Trigger Activity |
|---|---|---|---|
| Test Run | Validate logic and connections. | Sample or fake data. | Manually executed once. |
| Live Mode | Execute real automation. | Live, actual data. | Listens and reacts automatically. |
Remember, even in live mode, you can always pause your scenario to make adjustments. The iterative process of testing, going live, monitoring, and optimizing is key to building effective and reliable automations that save you time and streamline your operations.
How to Find and Use Pre-Built Templates
For beginners, the most effective way to start automating with Make is by leveraging its extensive library of pre-built templates. These templates are ready-made workflows designed for common business scenarios, such as saving email attachments to cloud storage or posting social media updates automatically. You can find them directly on the main dashboard in the “Templates” section, or by browsing categories that match your needs. Using a template eliminates the guesswork and allows you to see practical connections between apps.
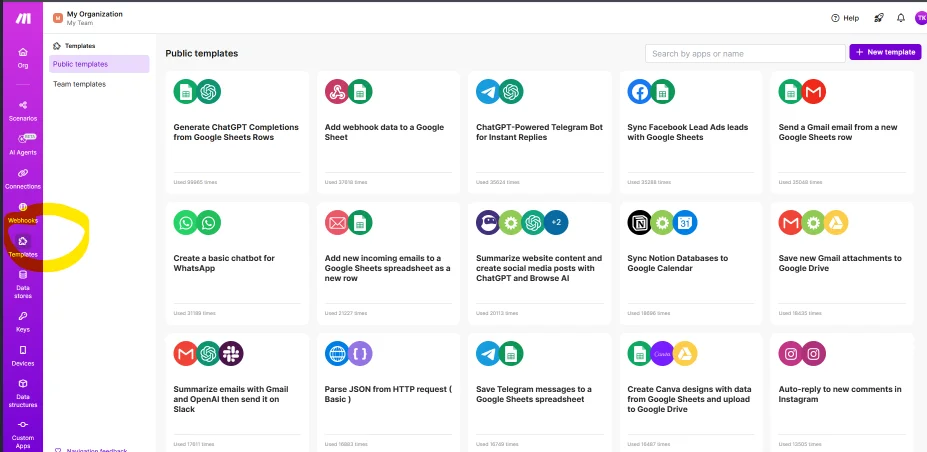
When you select a template, Make will present you with a clear visual tutorial in the form of the already-connected modules. Your first step is to review this automation blueprint and configure the necessary integrations. This typically involves clicking on each module to authorize and connect your actual apps (like your Gmail or Google Drive account). The pre-set logic shows you how data flows from one step to the next, providing an excellent learning foundation for building your own workflows from scratch later.
Steps to Implement a Template
- Browse & Select: From the Templates page, use filters to find a workflow for your use case (e.g., “Lead Management” or “Data Synchronization”).
- Examine & Configure: Study the scenario map. Click on each module to establish the app connections with your own accounts and set any initial filters.
- Test & Activate: Run a single execution to see if data moves correctly through the workflows. Once verified, turn the automation on.
Remember, templates are highly customizable. After the initial setup, you can add new modules, change connections, or introduce filters to tailor the automation precisely to your process. This flexibility makes them a powerful tool for both learning and immediate productivity gains.
| Template Element | Purpose for Beginners |
|---|---|
| Pre-built Modules | Shows how to structure common scenarios without building from zero. |
| Established Connections | Demonstrates how integrations are linked logically. |
| Visual Workflow Map | Acts as an interactive tutorial for understanding data flow. |
Browsing the Template Library for Common Workflow Ideas
Exploring the Template Library is the perfect way to transition from tutorial concepts to building your own automated workflows. This vast collection provides pre-built solutions for countless business and personal scenarios, allowing you to see the practical application of modules and connections instantly. By starting with a template, you learn the structure of effective automations without starting from a blank canvas.
Each template is a ready-to-use blueprint that you can customize to fit your exact needs. They demonstrate how to logically chain triggers and actions together, giving you a clear understanding of data flow. This hands-on exploration is invaluable for solidifying your knowledge and sparking ideas for original automations you can later create from scratch.
How to Effectively Use Templates for Learning
To get the most out of the library, follow this approach:
- Search by Keyword: Look for templates related to your tools (e.g., “Gmail,” “Slack,” “Google Sheets”) or tasks (“lead capture,” “social media posting”).
- Study the Blueprint: Before clicking “Use template,” examine the workflow. Identify the trigger, the sequence of actions, and how the modules are linked.
- Customize and Activate: Add the template to your dashboard and replace the placeholder connections with your own accounts. Modify steps to match your specific process.
- Analyze and Iterate: Run the workflow and monitor its performance. Use this insight to tweak settings or add new steps, deepening your understanding.
| Template Category | Common Triggers & Scenarios | Key Learning Outcome |
|---|---|---|
| Social Media | New post on Instagram, New video on YouTube | Automating cross-platform sharing and content archiving. |
| Email Management | New email in Gmail, New form submission | Creating automatic replies, sorting, and data extraction. |
| Project Management | New task in ClickUp, Updated row in Airtable | Syncing data between apps and notifying team members. |
In summary, the Template Library is not just a collection of shortcuts; it’s a critical educational tool. By deconstructing these pre-built workflows, you rapidly advance from following a basic tutorial to confidently designing complex automations. It bridges the gap between theory and practice, showing you the powerful connections possible between your favorite apps and empowering you to build solutions for your unique scenarios directly from your dashboard.
Q&A:
I’m completely new to automation. What is the very first thing I should do in Make.com after signing up?
After creating your account, don’t jump straight into building a scenario. First, spend 10-15 minutes exploring the interface. Click on the “Scenarios” tab to see the main workspace. Then, visit the “Connections” section to link an app you use often, like Gmail or Google Sheets. This step is required before you can use that app in automations. A good first task is to create a simple connection to one service. This familiarizes you with the authentication process, which is a common step for many apps.
Can I use Make.com to save email attachments to Google Drive automatically?
Yes, this is a common and practical use. You would create a scenario with a Gmail module as the trigger. Set it to watch for new emails, and you can add filters like a specific sender or subject line. The next module would be Google Drive’s “Upload a file” action. The key is mapping the “Attachment” data from the Gmail module to the file field in the Drive module. Make.com will process each attachment it finds. This removes the manual step of downloading and uploading files.
How does the visual builder work? I’m confused by terms like “modules,” “routes,” and “filters.”
The visual builder is where you create automations, called “scenarios.” Think of it as a flow chart. Each box is a “module,” representing a single step. The first module is always a trigger—an event that starts the scenario, like a new form submission. Subsequent modules are actions, like sending an email or creating a record. “Routes” are pathways that split your flow based on conditions. For example, you can have one route for high-priority emails and another for low-priority. “Filters” are the conditions set on a route to decide which path the data takes. You don’t need to use routes for simple, linear scenarios.
What’s the difference between the free and paid plans? Are there major limits?
The free plan is robust for learning and simple tasks but has operational limits. The most significant limit is on operations. Each step in a scenario (each module execution) consumes one operation. Free accounts get 1,000 operations per month. If a scenario has 5 modules and runs 10 times, that uses 50 operations. Paid plans increase this limit and add features like unlimited active scenarios, faster execution schedules, priority support, and the ability to handle more data per operation. For a beginner, the free tier is sufficient to test ideas and automate a few key tasks.
I built a scenario, but it’s not running. What are the most common reasons for this?
Several points can stop a scenario. First, check if the scenario is turned “ON” (the toggle switch in the top right). Second, verify the trigger event. If it’s set to watch for a “New Email,” send a test email *after* activating the scenario. Third, inspect your connections. An expired password or revoked access can cause a module to fail. Click the connection icon in the relevant module to re-authenticate. Fourth, review any filters or conditions. Data might not meet the strict rules you set. Use the scenario’s history log to see exactly where the execution stopped and what data was present at that time.
I’m a total beginner. What is the absolute first thing I should do after signing up for Make.com?
After creating your Make.com account, the best first step is to explore the template library. Don’t try to build a complex automation from scratch immediately. Instead, go to the “Templates” section and use the search bar to find something related to your work. For example, search for “Save Gmail attachments to Google Drive” or “Post Instagram photos to Facebook.” Choose a simple, popular template and click “Use this template.” The platform will guide you through connecting your apps (like Gmail or Google Drive) and show you a pre-built workflow. Running this ready-made automation helps you understand how connections and scenarios work without the pressure of designing it yourself. It’s a practical, hands-on introduction that teaches the basics in minutes.
I connected my apps and built a scenario, but it’s not running. What are the most common mistakes I should check for?
Several common issues can stop a scenario. First, check the connections for each module (the blue icons). Click on each module and select “Reconnect” to ensure your app login is still valid. Permissions can expire. Second, look for red error icons on any module. Click on them to see a detailed error message; it often tells you exactly what’s wrong, like a missing field or invalid data. Third, verify your filters or routers. If you’ve added a condition to control the flow, the data might not meet it, so the scenario stops there. Test by temporarily removing filters. Finally, ensure the trigger event has actually occurred. A “New Email” trigger won’t run unless a new email arrives. Use the “Run once” button on the trigger module to test with sample data and see where the process fails.

